> ## Documentation Index
> Fetch the complete documentation index at: https://docs.runpulse.com/llms.txt
> Use this file to discover all available pages before exploring further.
# Platform Quickstart
> Build and run your first Pulse pipeline in the Playground.
Use the Pulse Platform when you want to understand a document workflow visually before you write production code. The Playground lets you upload a sample file, add pipeline steps, inspect results, save reusable presets, and generate SDK code from the exact configuration you tested.
Sign in, create or select an organization, and open the Playground.
Use the API quickstart for Python, TypeScript, and REST examples.
## Create Or Sign In
Start by signing into the Platform, or create an account if your team is new to Pulse.

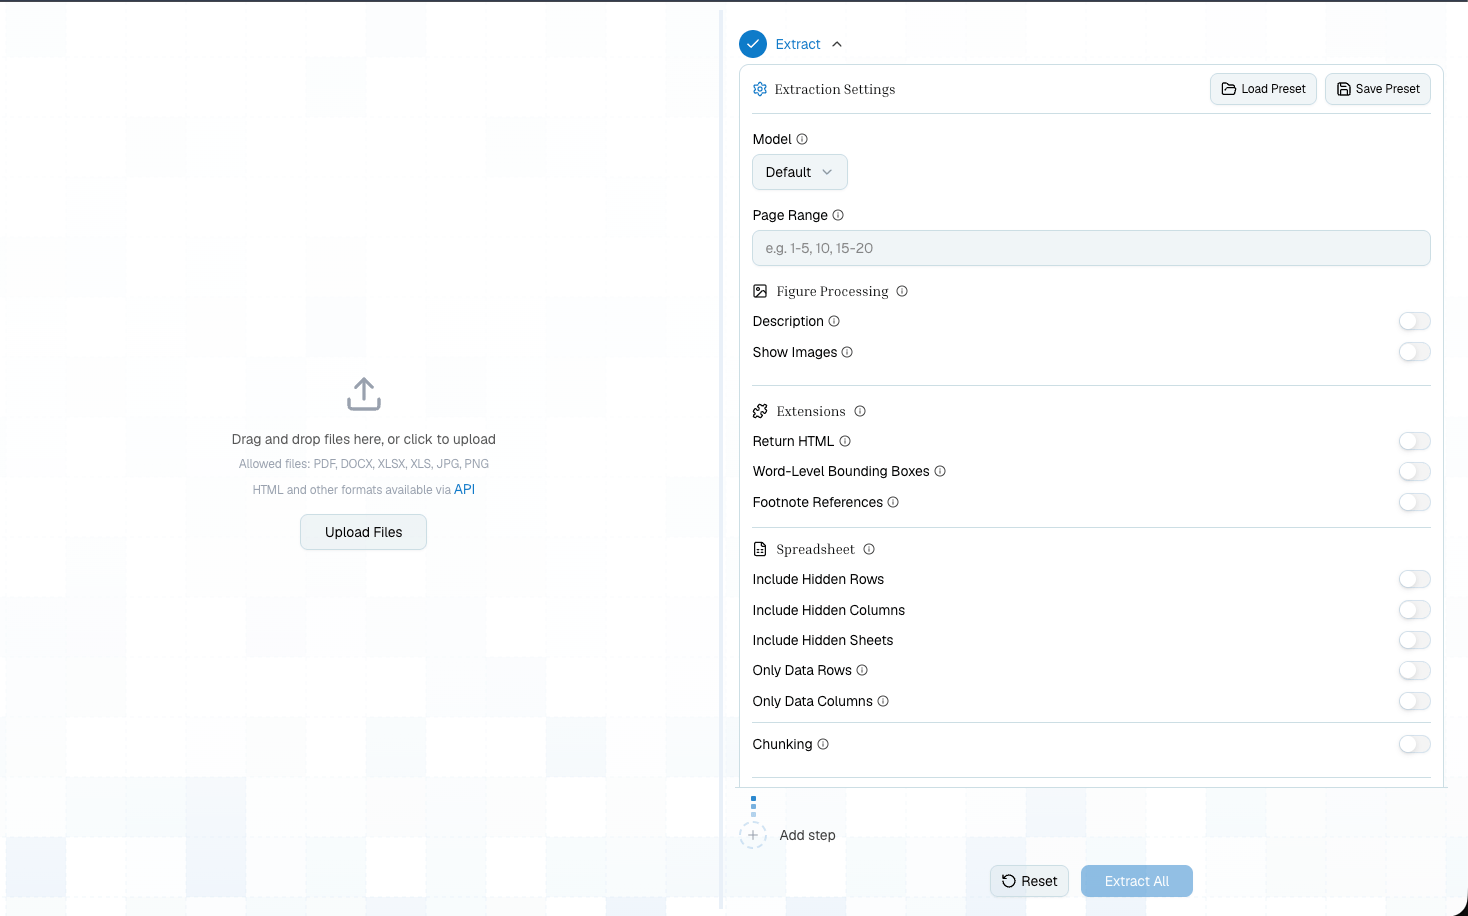
 ## What You See First
The first screen is the Playground: upload on the left, extraction settings on the right, and pipeline controls below the configured step.
## What You See First
The first screen is the Playground: upload on the left, extraction settings on the right, and pipeline controls below the configured step.
 ## First Pipeline
Open **New Extraction** from the sidebar and upload a PDF, spreadsheet, Word document, image, or supported file URL.
Run the default **Extract** step first. This gives you markdown, detected tables, figures, citations, page count, and an `extraction_id` you can reuse.
Review the Markdown and Tables tabs. For PDFs and images, use the document viewer to compare extracted content against the original page.
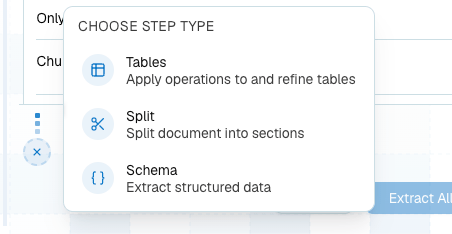
Add **Schema** when you need structured JSON, **Tables** when the output is table-first, or **Split** when different sections need different treatment.
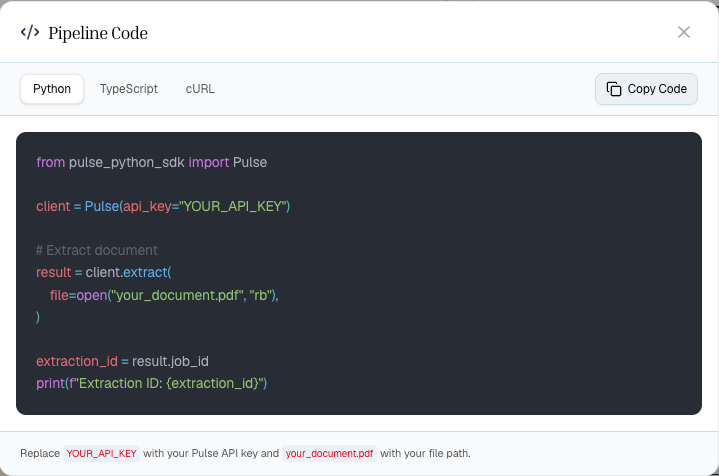
Save step presets once the output looks right, then use **Show Code** to generate Python, TypeScript, or cURL that reproduces your pipeline.
## Add And Configure Steps
After Extract, add the next processing step from the pipeline menu.
## First Pipeline
Open **New Extraction** from the sidebar and upload a PDF, spreadsheet, Word document, image, or supported file URL.
Run the default **Extract** step first. This gives you markdown, detected tables, figures, citations, page count, and an `extraction_id` you can reuse.
Review the Markdown and Tables tabs. For PDFs and images, use the document viewer to compare extracted content against the original page.
Add **Schema** when you need structured JSON, **Tables** when the output is table-first, or **Split** when different sections need different treatment.
Save step presets once the output looks right, then use **Show Code** to generate Python, TypeScript, or cURL that reproduces your pipeline.
## Add And Configure Steps
After Extract, add the next processing step from the pipeline menu.
 As the pipeline grows, each step gets its own configuration panel. Keep the first version narrow, then iterate with reruns and saved presets.
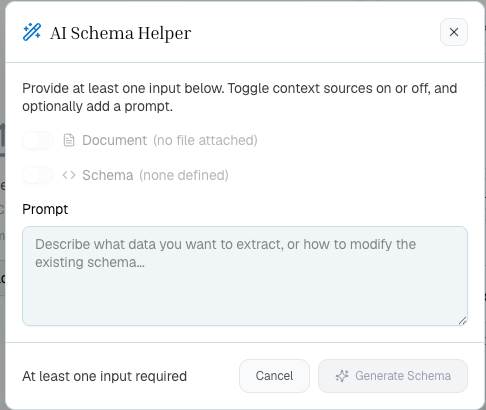
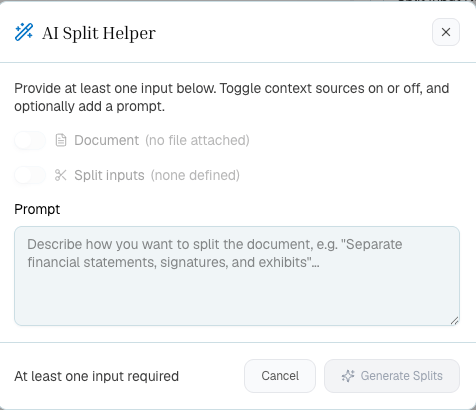
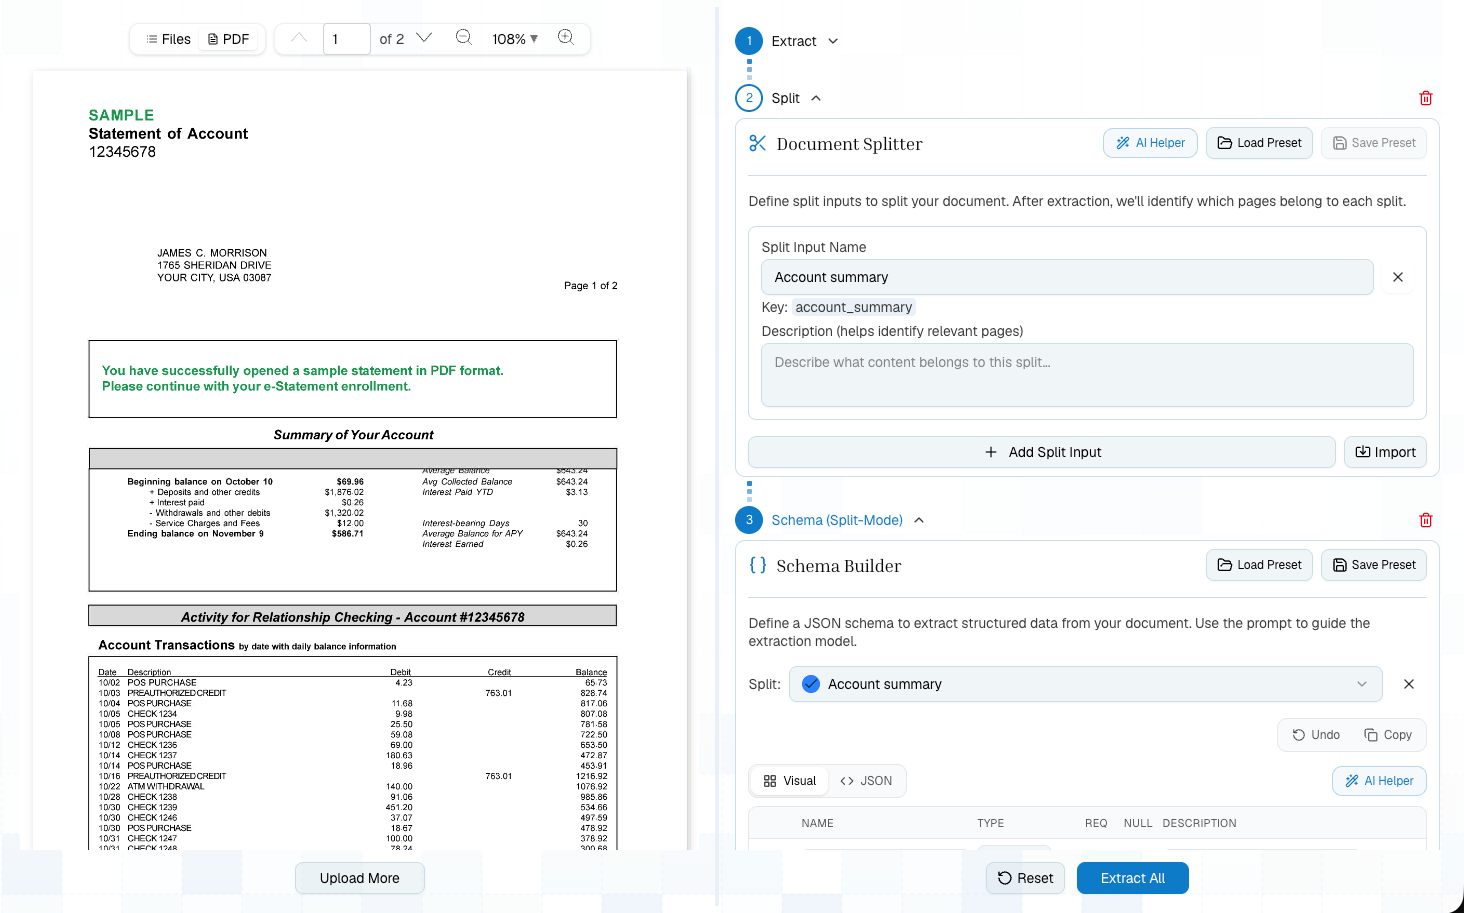 ## Use AI Helpers For Drafts
Schema and Split both include AI helpers. Use them to draft a first schema or topic list from a prompt, then tighten field names, descriptions, required fields, and topic boundaries before saving presets.
## Use AI Helpers For Drafts
Schema and Split both include AI helpers. Use them to draft a first schema or topic list from a prompt, then tighten field names, descriptions, required fields, and topic boundaries before saving presets.
 ## What To Try First
| Goal | Start with | Add next |
| ------------------------------------ | ------------------- | ------------------------- |
| Read or index a document | Extract | Chunking or HTML output |
| Pull invoice or form fields | Extract | Schema |
| Rebuild financial tables | Extract | Tables with merge enabled |
| Route a long document by topic | Extract | Split |
| Extract different fields per section | Extract | Split, then Schema |
| Move a tested workflow into code | Any tested pipeline | Show Code and presets |
If you are unsure which step to add, see [Choose Your Workflow](/concepts/choose-workflow). It is the fastest way to decide between Schema, Tables, and Split.
## Production Handoff
The Platform is not a separate product path from the API. It is the safest way to design the workflow:
1. Build the pipeline on representative documents.
2. Save any extract, split, schema, or table presets you want to reuse.
3. Click **Show Code** to copy the equivalent SDK call sequence.
4. Replace the sample file and API key in your app.
5. Use async processing, webhooks, or batch endpoints when you move to higher volume.
When the pipeline is ready, **Show Code** gives you the matching Python, TypeScript, or cURL implementation.
## What To Try First
| Goal | Start with | Add next |
| ------------------------------------ | ------------------- | ------------------------- |
| Read or index a document | Extract | Chunking or HTML output |
| Pull invoice or form fields | Extract | Schema |
| Rebuild financial tables | Extract | Tables with merge enabled |
| Route a long document by topic | Extract | Split |
| Extract different fields per section | Extract | Split, then Schema |
| Move a tested workflow into code | Any tested pipeline | Show Code and presets |
If you are unsure which step to add, see [Choose Your Workflow](/concepts/choose-workflow). It is the fastest way to decide between Schema, Tables, and Split.
## Production Handoff
The Platform is not a separate product path from the API. It is the safest way to design the workflow:
1. Build the pipeline on representative documents.
2. Save any extract, split, schema, or table presets you want to reuse.
3. Click **Show Code** to copy the equivalent SDK call sequence.
4. Replace the sample file and API key in your app.
5. Use async processing, webhooks, or batch endpoints when you move to higher volume.
When the pipeline is ready, **Show Code** gives you the matching Python, TypeScript, or cURL implementation.
 ## Next Steps
Decide which pipeline shape fits your document.
Learn each part of the Playground in more depth.
Run the same flow from code.
Turn a tested pipeline into production SDK calls.
## Next Steps
Decide which pipeline shape fits your document.
Learn each part of the Playground in more depth.
Run the same flow from code.
Turn a tested pipeline into production SDK calls.